Alexa, Flush The Toilet

As the title suggests, I’ve rolled up my sleeves and created a way to flush a toilet and integrate that into my home automation system.  The commands work with my Amazon Alexa for ease of use using some custom Arduino code. I also have an Echo Dot mounted in my bathroom.

The original handle on the toilet works as normal.  The servo is mounted in a custom 3D printed case that fits above the flapper and around the overflow valve.  The servo wires are connected to the NodeMCU that is in a custom 3D printed case that hangs on the side of the toilet.  The whole system is powered through a single cable either using a power bank or standard usb-b phone charger.

Device In Action

Component List

-Access to 3D printer
-NodeMCU
-MG996R Digital Torque Metal Gear Servo
-Chain for servo to flapper
-Power (battery bank or phone charger)
-Usb-b cable

3D Printed Parts

Available on Thingiverse – Download Here 

Alexa Echo Dot Servo Arduino NodeMCU Smartthings Home Automation 3d printing
Servo Overflow Mount

Alexa Echo Dot Servo Arduino NodeMCU Smartthings Home Automation 3d printing case
NodeMCU Toilet Side Mount


Installation

Connect the red wire to the 3.3v connector on the NodeMCU.  Connect the black/brown wire to GROUND.   The yellow/orange cable should be connected to D1 on the NodeMCU.

I installed the servo motor to the mount that goes on the overflow valve with two screws on each side.  The chain is mounted from the last hole on the servo arm to the flapper. There should be a little play in the flapper chain. Wash your hands!!!! It is a toilet. 

The original handle can be left installed.  You could also replace the normal flush handle with an electric push button.

Toilet Alexa Echo Dot Servo Arduino NodeMCU Smartthings Home Automation 3d printing case
Toilet Overflow Servo Mounted


NodeMCU Mount Toilet Alexa Echo Dot Servo Arduino NodeMCU Smartthings Home Automation 3d printing case
NodeMCU Mount Toilet Side Mount


Program NodeMCU

Below is the code that I am currently using for this project. The code is horrible and I am working on better code to replace it.  You can download this garbage and use it if you want.  It works but it is not up to my standard.  Feel free to email me or contribute in this section.

Download – Toilet Servo Trash


The Advantage Of 3D Printing

3D printing is an innovative rapid prototyping technology that utilizes a 3D printer to manufacture an actual three-dimensional object. It is currently used in various industries because it is known to increase a company’s profit. However, little is yet known of its advantage in schools.
Both teachers and students need every advantage they can get in order to have a productive educational experience. In school, there must be an effective and efficient imparting of knowledge and skill from the teacher to the student.
3D printing provides new advantages that may revolutionize education. It has unique advantages that may increase the probability of a productive educational experience. Here are three advantages of 3D printing in a school setting.

Enhanced teaching aide

Visual aides are important in effective and efficient teaching. Traditionally, teachers make use of words and pictures either to illustrate a point or to provide an example. With a 3D printer, the teacher has a technologically advanced pedagogical tool at his disposal that is much better than the conventional visual aide. Instead of using mere words or pictures when giving a lecture, the teacher can now present to the class a three-dimensional object, which the students can see and touch.
As an enhanced teaching aide, 3D printing is extremely beneficial in classes wherein three dimensional models are a must see. In a World Civilization class for example, there is no better way to discuss the Taj Mahal of India than to show a miniature three-dimensional model of this oriental architecture marvel. By showing a small replica of the Taj Mahal, it is easier for the teacher to seize the interest of his students compared to just showing them a pictorial representation. It is also easier for the teacher to discuss the Taj Mahal because it is as if the structure itself is present to them. What are normally considered as boring history classes like World Civilization can now become interesting with the use of 3D printing.
3D printing as an enhanced teaching aide makes a class interesting for students. More often than not, it is when students are interested that they get to learn more in school.

Innovative student projects

Imagine a school with engineering and architecture students who have access to a 3D printer. Since 3D printing is a rapid prototyping technology, in which a physical object is constructed by a machine, the students will be able to produce realistic three-dimensional mini-models of their structural designs without having to waste time and effort trying to build those small-scale structures manually. They will also be able to identify the mistakes of their design, get to receive critiques from the teacher, and edit their projects all at a faster pace.
Aside from engineering and architecture, 3D printing is of advantage to Multi-Media Arts students. With the help of a 3D printer, their three-dimensional computer aided designs can now come to life in the real world. Now that is something new.

Interactive class activities

Another advantage of 3D printing is that there is more room for interactive class activities. The interaction is of course limited only to the imagination of the teacher and his students. In a biology class for example, the teacher through the use of a 3D printer can create a 3D model of a person’s head. As part of the activity, the class will have to supply the rest of the body parts by creating them through the use of the 3D printer.
3D printing is a ground-breaking technological advancement of our age. Since it offers novel advantages that assist in the fulfillment of a productive educational experience, it is only reasonable that schools begin utilizing 3D printers.

3D Printing Files

3D Printing Files

The two most common printer files you will encounter are .STL and .Gcode files.  Understanding these will remove some of the confusion when 3D printing for the first time.

STL Files

The first file we will cover are .STL files.  This file format is supported by many different modeling programs that are used for creating 3D shapes of objects.  The files are created using CAD (Computer aided design) like AutoDesk, Fusion360, TinkerCad and many more.  The data  stored in these files do not take into account what type of filament color or types you are using.  It is not possible to print .STL files directly because your printer does not know what you want to do with the model.  You will need to “Slice” this model into .Gcode so your printer can understand it.

Gcode Files

You’re probably asking yourself, “How do I slice and why do I need to do this”?  Creating or finding the part is only half of the equation when 3D printing.  You need “Slicing” software, like Cura, to create the instructions your printer needs to build the model on the 3D printing build plate.  The code is a jumble of letters and numbers that the printer uses to understand how fast to move, when to retract, how much plastic to feed and at the exact X/Y/Z coordinates.  Gcode is also used when operating CNC Machines (Computer numerical control) becuase it defines how fast and at the exact X/Y/Z coordinates the tool should cut.

Basically, to create the Gcode you will need to load your .STL files into a slicing software to tell the printer how to print.

Octopi – Send Prints From Cura

Cura allows users to send and monitor prints directly from the slicer.  Adding this new option send the prints to Octopi, starts the print and will show a preview window with of a webcam.  There is another option to store the G-code directly to the SD card on the printer but it is not recommended.

Instructions:

Verify Octoprint plugin is installed

With Cura open, click on Plugins and Browse Plugins..

In the preferences window, verify that OctoPrint Connection is checked.

If the option for Octoprint Connection is unavailable , select Plugins and Browse Plugins.. from the main menu.  Download the OctoPrint Connection plugin.

Configuring Cura for Octoprint

With Cura open, click on Preferences and Configure Cura..


Click on Printers in the left menu.  Click on Connect OctoPrint.

The default setting connects to octopi.local/I have found this to be unreliable so I created a new setting that points to the static local IP of my Raspberry PI (Octopi).   To do this click the Add button.


Type an instance name.  You can use any name you want.  This would be useful if you have more than one Raspberry Pi setup.

Type in the IP address for you Raspberry Pi running Octopi.  The default port number is 80.  Click on the Ok button.


You will need the API Key from Octopi to complete the connection to Cura.  Navigate to the home page on your Octopi Setup.  (octopi.local/).

Click on the wrench on the menu bar of the webpage to open OctoPrint settings.

In the left menu, click on API.

The API Key will be in the field to the right.  Copy the text for the API key.


Navigate back to Cura.  You will need to enter the API Key in the field below.  You have the option to check Automatically start print job after uploading, Show webcam image and Store G-code on the printer SD card. 

I checked all except the option to save the G-Code to the printer SD card.

Click Close.

There will now be an option to Print with Octoprint in Cura.

The monitor tab can be used to control the printer, view printer stats and webcam.

Octopi – Timelapse – Camera Setting

I recently covered how to remove the octopus from your time lapse in my article here.  Another setting that I had to change was the camera resolution.  I’m only using a $5 Raspberry Pi camera from Ebay but it is much better than the defaults used by Octopi.

You will need to SSH into your Raspberry Pi.

You will need to install Putty or WinSCP to SSH into your Raspberry Pi.  I will not cover that in this tutorial.  If you are not sure how to SSH into your Raspberry Pi, go learn how to do that and come back here.  There are thousands of tutorials on the internet but basically you will enter the IP address and SSH port number (typically 22) and your username and password to get to the terminal.

Once at the terminal, you will need to type the following command to get to the correct directory.

cd /boot/

Next, type the command to open the octopi.txt file to change the resolution and fps settings.

sudo nano octopi.txt

Edit the octopi.txt file by pressing down on the keyboard until you get to the #camera_raspi_options=”-fps 10″ setting.  Create a line under this comment using the code below.

camera_raspi_options="-fps 10 -x 1280 -y 720"

Press Control+X to exit.  Save the file and reboot your Raspberry Pi.

You are done.  Enjoy the updated resolution settings.


Octopi – Timelapse – Watermark Removal

The timelapse feature in Octopi is awesome.  It is even better with the pesky little octopus in the bottom left corner.  I will walk you the steps to remove the watermark from your videos.

You will need to SSH into your Raspberry Pi.

You will need to install Putty or WinSCP to SSH into your Raspberry Pi.  I will not cover that in this tutorial.  If you are not sure how to SSH into your Raspberry Pi, go learn how to do that and come back here.  There are thousands of tutorials on the internet but basically you will enter the IP address and SSH port number (typically 22) and your username and password to get to the terminal.

Once at the terminal, you will need to type the following command to get to the correct directory.

cd ~/.octoprint/

Next, type the command to open the config.yaml file to change the watermark setting.

sudo nano config.yaml

Edit the config.yaml file by pressing down on the keyboard until you get to the webcam settings.  You will need to either create the watermark line in this file or change the setting from true to “false” by typing over the current configuration.

webcam:
ffmpeg:  /usr/bin/avconf
watermark:  false

Below is an example of my configuration with the watermark removed.

Press Control+X to exit.  Save the file and reboot your Raspberry Pi.

You are done.  Enjoy a watermark free image.


OctoPi Control – MonoPrice Mini Select V2

Octopi is a Linux distribution that gives you the ability to control and view most 3D printers from a webpage.  There are options to create a video time lapse, temp control, temp monitoring, bed temp control, print storage, view Gcode as the print is happening and a terminal to view and send commands.  The printer also has Cura 15.01 baked in so you can slice your files on the Raspbery Pi.  Although that option is available, It is slow and an outdated version of Cura so I typically upload the Gcode files that I’ve already sliced from my computer.There are install instructions for Mac and Windows, however this distribution was designed to operate on a Raspberry Pi.

Installation

For a typical install you will need hardware below:

  • Raspberry Pi (I use model 3)  $35
  • A camera (I use a Pi camera from eBay $5)
  • 32GB micro SD card $10

Download the latest OctoPi image from https://octopi.octoprint.org/

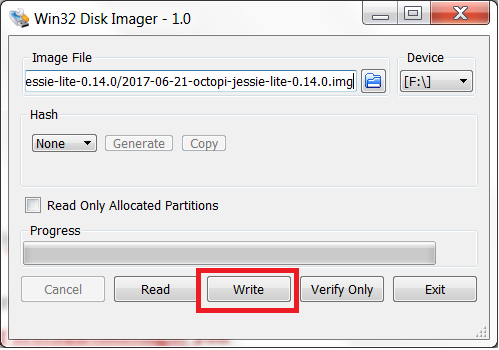
Insert your micro SD card into your computer and note the Drive letter.  ***If you choose the wrong drive letter when using Win32DiskImager you overwrite and unintended disk.  You’ve been warned. ***

Use Win32DiskImager to load the image onto your SD card.  Select your image in the Image File drop down menu.  Select your SD card drive letter from the Device drop down menu.  Click Write to begin writing.

Once the write process has been completed, you will want to edit the network configuration file on the SD card so that your Raspberry Pi will know which network to connect to.

Open octopi-network.txt with Notepad++.

You will type your router’s SSID and password in the text file and remove the # symbol to allow the commands to execute.

Example of lines edited:

Before

##WPA/WPA2 secure
#iface wlan0 inet manual
#wpa-ssid "put SSID here"
#wpa-psk "put password here"

After

##WPA/WPA2 secure
iface wlan0 inet manual
wpa-ssid "MyHomeWifiName"
wpa-psk "MyHomeWifiPassword"

Save the text file.

Eject the SD card and insert it into the Raspberry Pi.

Power the RaspberryPi on.

Next you will access the Octopi webpage that is being hosted from the Raspberry Pi by typing in the ip address of the Raspberry Pi in your browser.  If you do not know the ip address of your Raspberry Pi, you can check your homes router to view any newly connected devices or use a network scanning tool.  You can also use the link http://octopi.local/ to access the page as well.


When you first access the Octopi, you will be prompted with questions about security.  It is your option to use a user/password to access your printer.  I recommend securing this if you plan on accessing your printer outside of your network through the use of port forwarding.

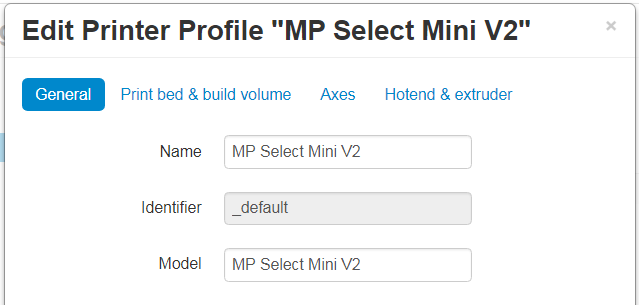
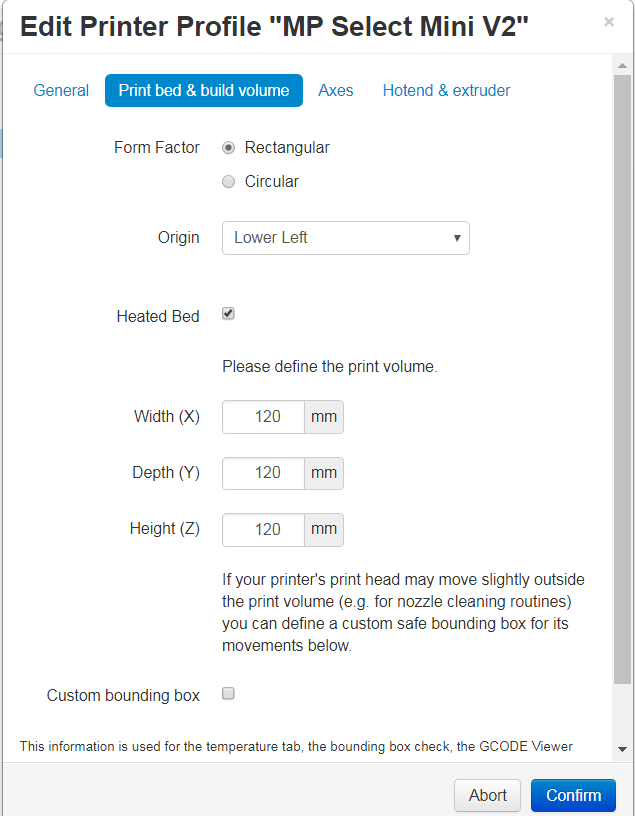
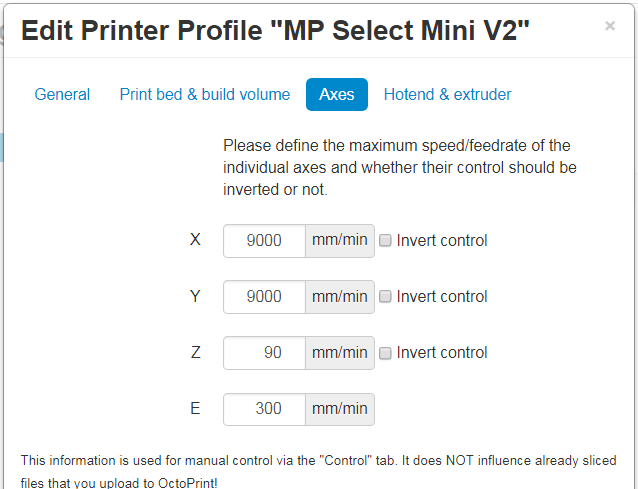
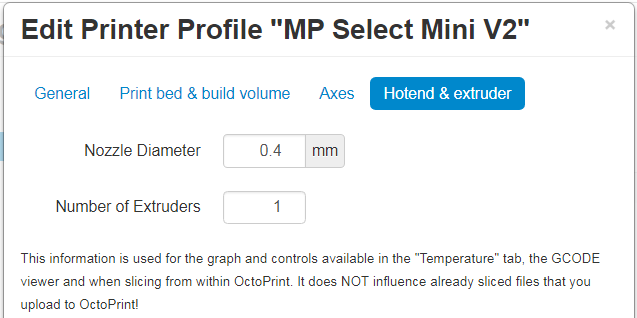
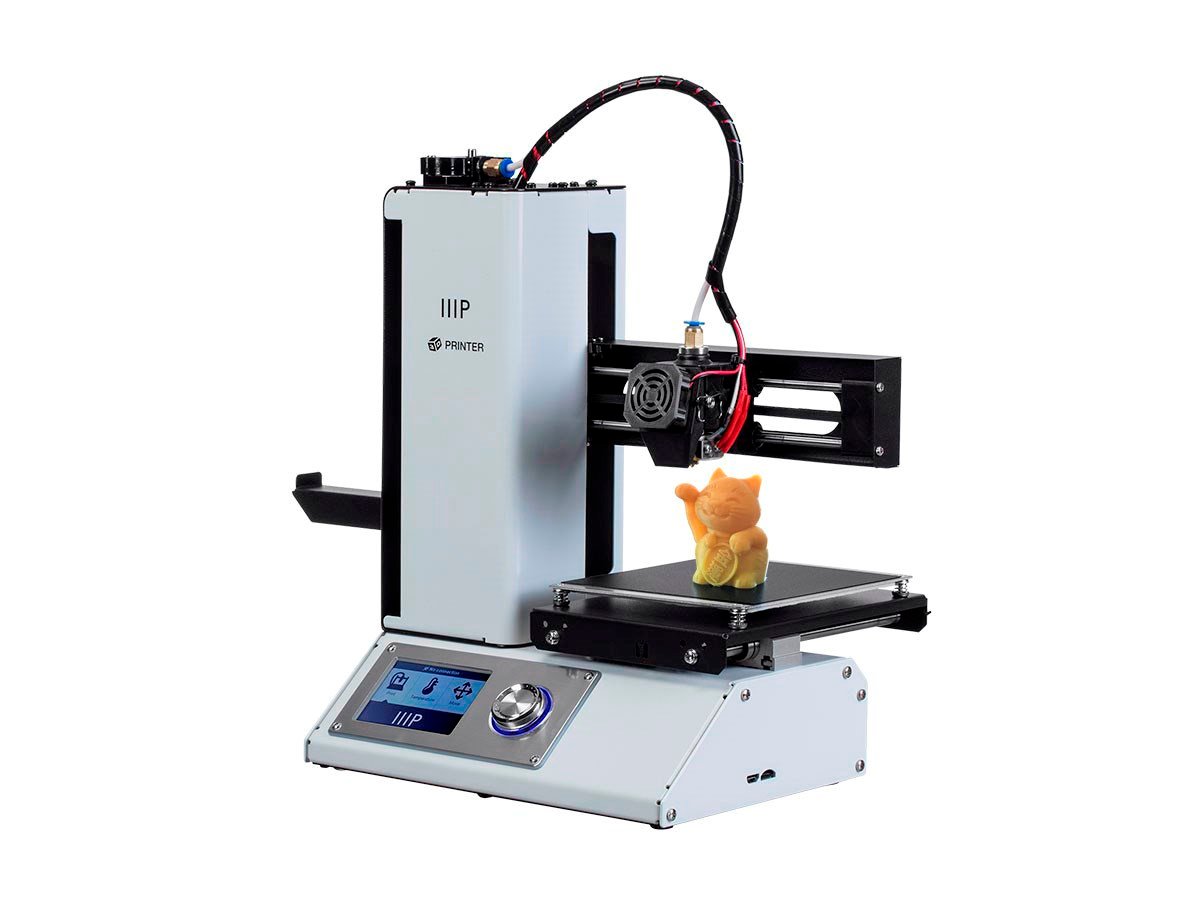
Printer Profile Setup – Monoprice Mini Select V2

Note: These instructions only work for the MonoPrice Mini select V2 (MPMS V2).

Use the printer settings below for reach of the option menus and then click “confirm” at the bottom.

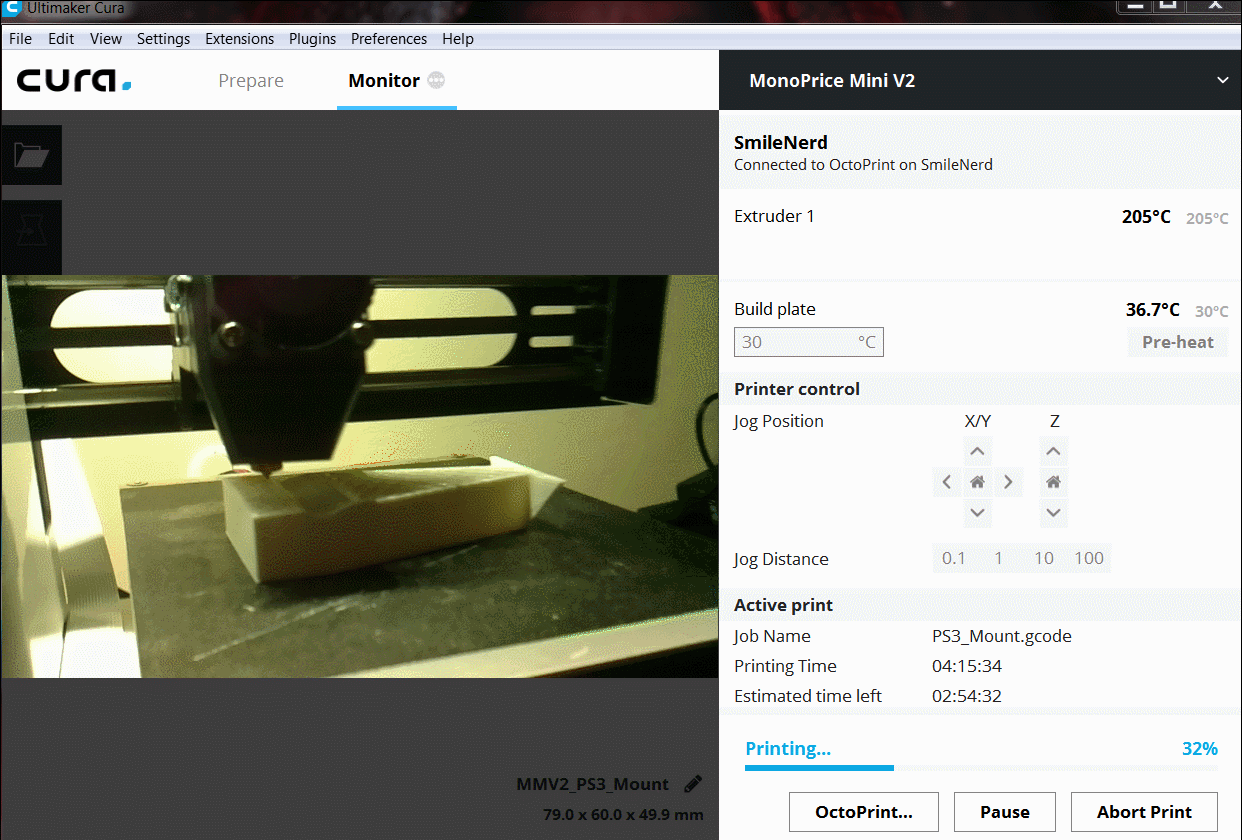
Once your printer has been setup and your Raspberry Pi has been restarted, go to the main page and select your printer from the connections tab.  Select 115200 for the Baudrate.  Click the connect button to connect your printer.

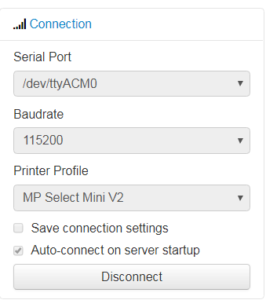
You can view that your printer has successfully connected by looking at the state of you printer on the left side of the main webpage window.

Troubleshooting

-Everything is working but the printer will not connect from the octopi webpage

Verify your printer settings are correct.  There is a wrench (settings) button in the top right corner.  The printer profiles can be edited here.

I sometimes have problems connected to the printer that was previously working and the connection will timeout.  Click connect then immediately disconnect and connect again.  I do not know why this works but it resolved my issue.


Filaments

There are many different types of materials, also know as filaments, that can be used with 3D printers.  Keep in mind that all materials do not work in all printers.  Please check with your printer specs before ordering or using a filament.

More materials and combinations and filament acronyms are being created each day so it can be a bit cumbersome to keep up with.  As of 2018, the cheapest materials to print are PLA and ABS.

There is a table in the wiki found here that has way more information about each type of material.

PLA

PLA (polylactic acid ) is by far the most commonly used filament in the 3D printing world at the moment.  There are a ton of advantages to using PLA.  The materials are cost effective when compare with others and the material is better for the enviroment becuase it is biodegradable.

The print temperature needed for PLA is typically lower than ABS and doesn’t have a gross chemical smell when printing.  Supports are often used when printing PLA but avoid when possible.   PLA has properties that make shards of it sharp and the material tends to snap instead of bending.

There are better consistencies of PLA being created that have shown to have been stronger than ABS in some cases.

ABS

ABS (Acrylonitrile butadiene styrene) is a widely used plastic in the world of injection molding becuase the material is tough and can take a beating.  If you are looking to make some small parts or for outdoor use then ABS may be your best option.  ABS is not biodegradable so anything you do not use will likely end up in the landfill.

The temperature needed for ABS is typically more than PLA and does emit a chemical burning smell while printing.  ABS is a material tends to bend instead of break and is very durable.  That is why you will see this type of material in car bumpers and lego bricks.

ABS has been know to curl or warp during printing.  This material is know to shrink and deform.  This is mostly due to the material and the type of printer being used.  Problems tend to occur more in open printers when compared to closed printers with a temperature control.

Cleaning

Cleaning filament is used to clear out the nozzle on 3D printers.  It is recommended that you use this periodically to keep things operational.

Wood

Yes, you can print wood in most 3D printers.  Wood filaments are typically made with PLA and a mixture of wood fibers.  An interesting property of this filament is that you can sand and stain it.

Flexible/Wearable

There are many different types of flexible/wearable filaments available including Nylon, PET, PP, FPE and PETT.  If you’re interested in this martial I recommend referring to the wiki for more information.

Glow in the dark/Transparent

There are several different options for a Glow-In-The-Dark or transparent material.  You can pick these up in large rolls of PLA.  I personally will avoid these because I plan on painting and finishing everything that I print.

Other

There are tons of materials that can be printed that I will not list here.  As the technology gets cheaper, I’m sure we will be printing in glass and metal.  Dissolvable filaments are typically used to wash away supports once a print has completed.   Rubber and heat resistant materials have been created and the list grows longer each day.

Finding a Printer

You are going to need to ask yourself a few questions to determine what type of printer to buy.  What types of things will you print?  How large?  What types of materials are important to you? What kind of budget are you working with?

Obviously we all want a 3d printer that can spit out titanium models in a few minutes.  If you have that type of coin, leave us plebeians to our penny pinching ways.  My journey is under $500 including the cost of filaments.

MP Select Mini 3D Printer V2 – $220


This is a nifty little budget printer.  For starters, this printer can be had for as little as $190 with coupon codes if you’re willing to wait.  This  printer is assembled when you receive it.  It has a color led display, wifi-enabled, large support base, a heated bed.  For the price, it makes some quality prints compared to the larger and more expensive printers.  There are a few limitations with a smaller printer.   The print speed is 55mm per second and the max extruder temperature does not get as high as some other pritners.  The resolution is 100 microns with a build area of 4.7″ x 4.7″ x 4.7″ (120 x 120 x 120 mm).  This can print both PLA and ABS filaments although it is widely recommended that you only use PLA.

This will be our first printer of choice.  Initially, I liked some of the larger printers but space in my work area is important to me so I went with a smaller setup.  I will use this to learn and decide how I feel about 3D printing in the future.

Maker Select 3D Printer v2 – $299

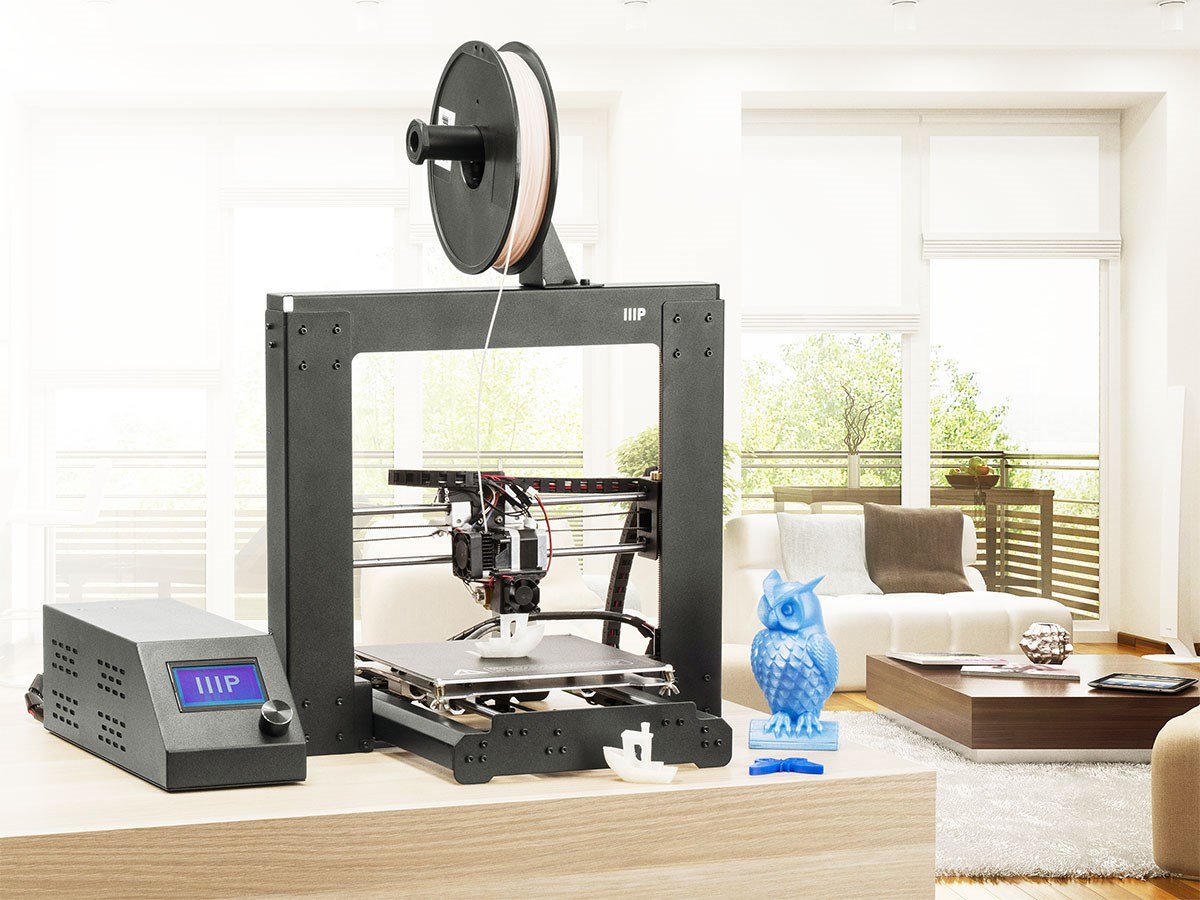
This is the larger version of the mini Maker select and would be my ideal choice if not for concerns with workbench space.   Although it prints at the same detail as the mini it has many other advantages at around the same price.  This printer has a large print bed at 7.9″ x 7.9″ x 7.1″
(200 x 200 x 180 mm).  This printer can use a ton of different filaments including ABS, PLA, XT Copolyester, PET, TPU, TPC, FPE, PVA, HIPS, Jelly, Foam and  Felty.  The print speed is 100mm/sec and the max extruder temperature is higher than the mini.  Sadly, this does not have built in Wi-fi like the mini but all things considered is an awesome choice.   Head over to monoprice.com to check it out.


Creality3D CR – 10S 3D – $399 – $450

The CR-10 is a printer with a ton of community support.  It has user replaceable parts.  The aluminium frame helps keep the extruder steady when creating prints.  The printer area is very large at 300mm x 300mm x 400mm.  This printer costs a bit more and requires some assembly but I’ve seen some great prints come out of this machine.  If you want to get some of the best prints without spending more than $500 then this might be the path for you.  These can often be found on Gearbest.com.

YouTube is a resource

I find many ideas and answers to my questions just by watching Youtube.  I highly recommend following RCLifeOn.  He has some great information on how to choose a 3D printer.