Alexa, Flush The Toilet

As the title suggests, I’ve rolled up my sleeves and created a way to flush a toilet and integrate that into my home automation system.  The commands work with my Amazon Alexa for ease of use using some custom Arduino code. I also have an Echo Dot mounted in my bathroom.

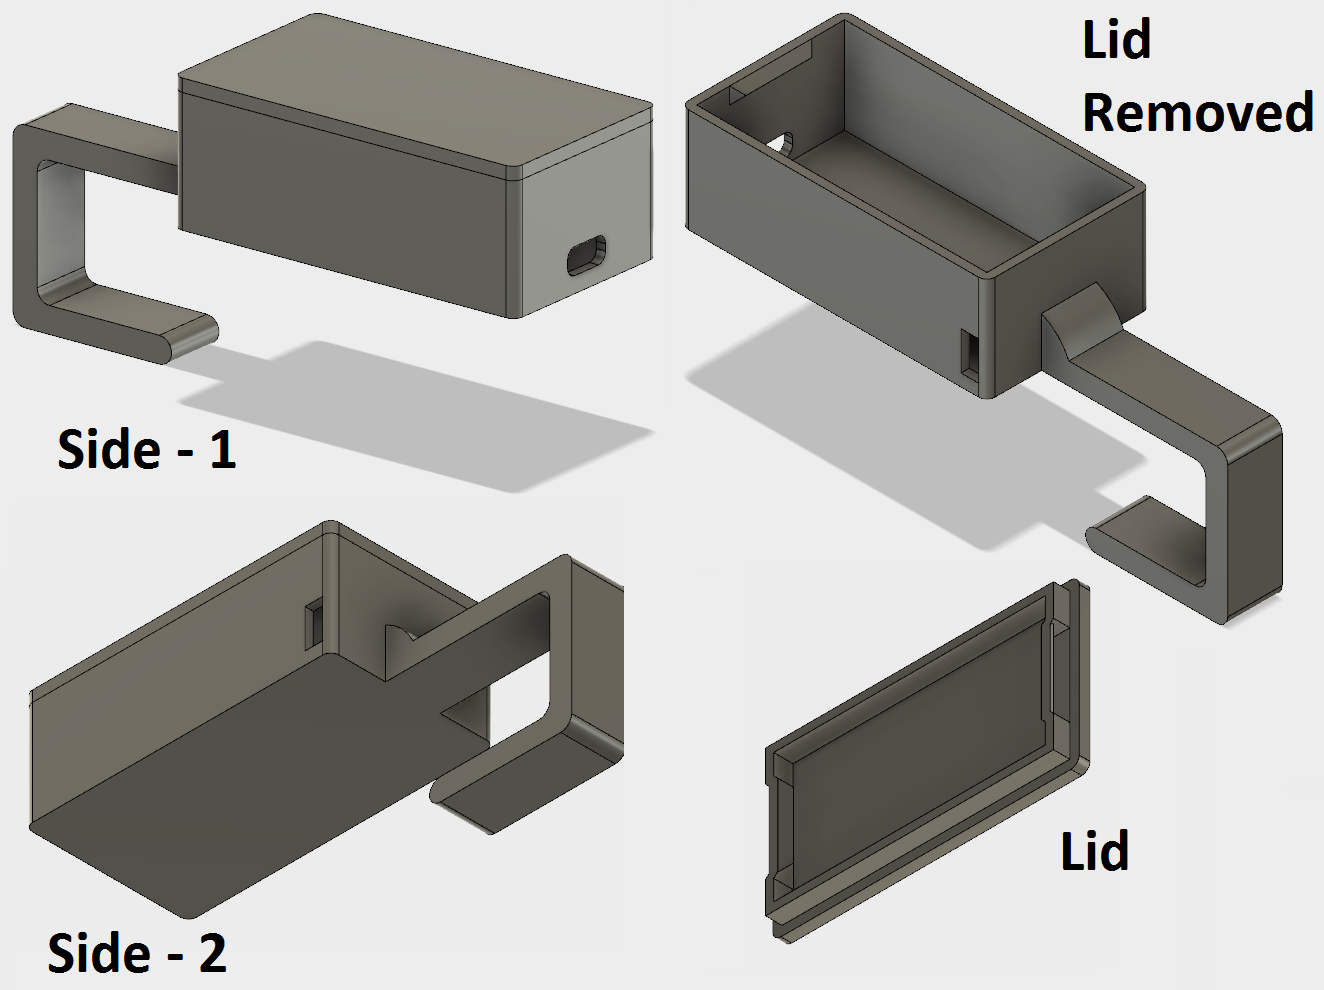
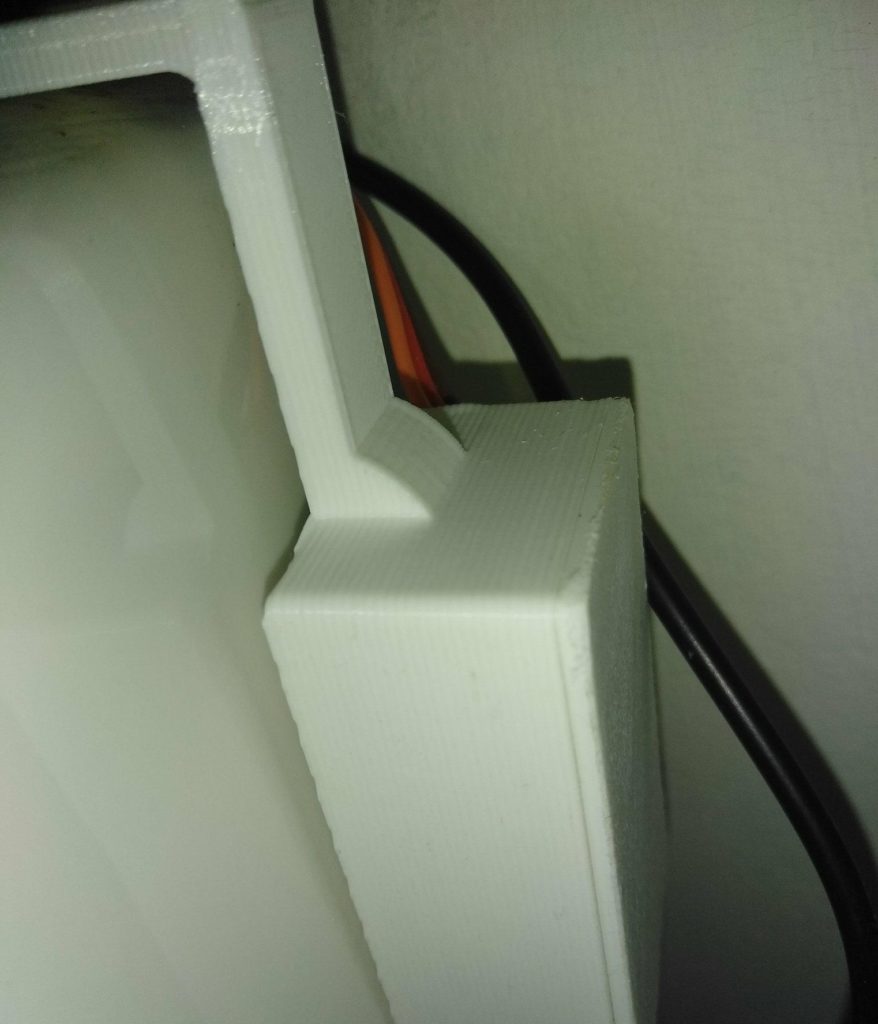
The original handle on the toilet works as normal.  The servo is mounted in a custom 3D printed case that fits above the flapper and around the overflow valve.  The servo wires are connected to the NodeMCU that is in a custom 3D printed case that hangs on the side of the toilet.  The whole system is powered through a single cable either using a power bank or standard usb-b phone charger.

Device In Action

Component List

-Access to 3D printer
-NodeMCU
-MG996R Digital Torque Metal Gear Servo
-Chain for servo to flapper
-Power (battery bank or phone charger)
-Usb-b cable

3D Printed Parts

Available on Thingiverse – Download Here 

Alexa Echo Dot Servo Arduino NodeMCU Smartthings Home Automation 3d printing
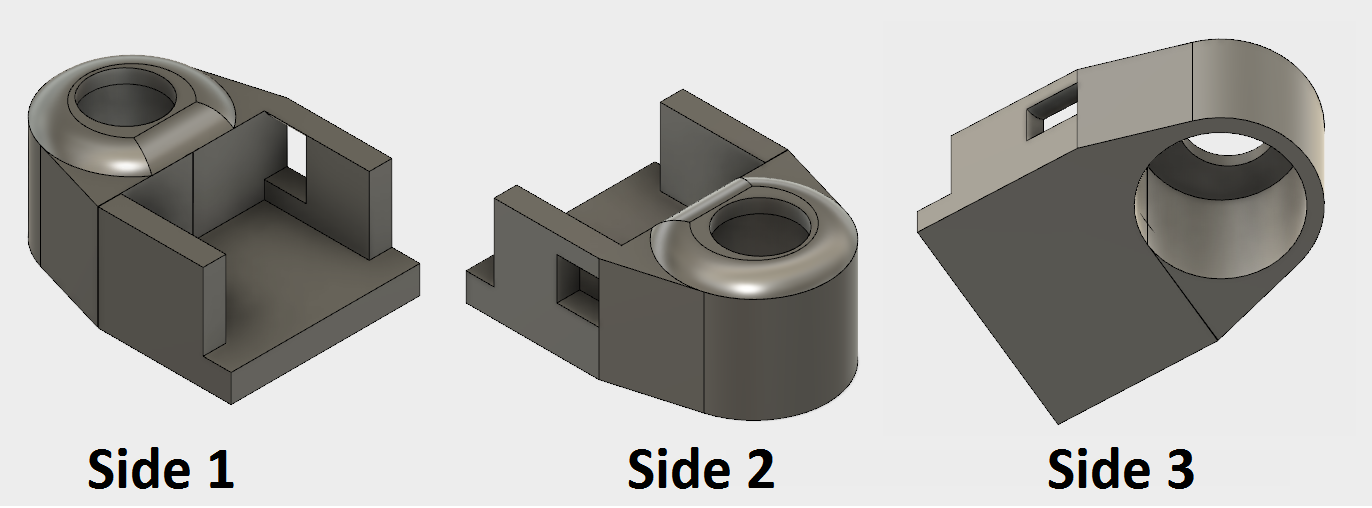
Servo Overflow Mount

Alexa Echo Dot Servo Arduino NodeMCU Smartthings Home Automation 3d printing case
NodeMCU Toilet Side Mount


Installation

Connect the red wire to the 3.3v connector on the NodeMCU.  Connect the black/brown wire to GROUND.   The yellow/orange cable should be connected to D1 on the NodeMCU.

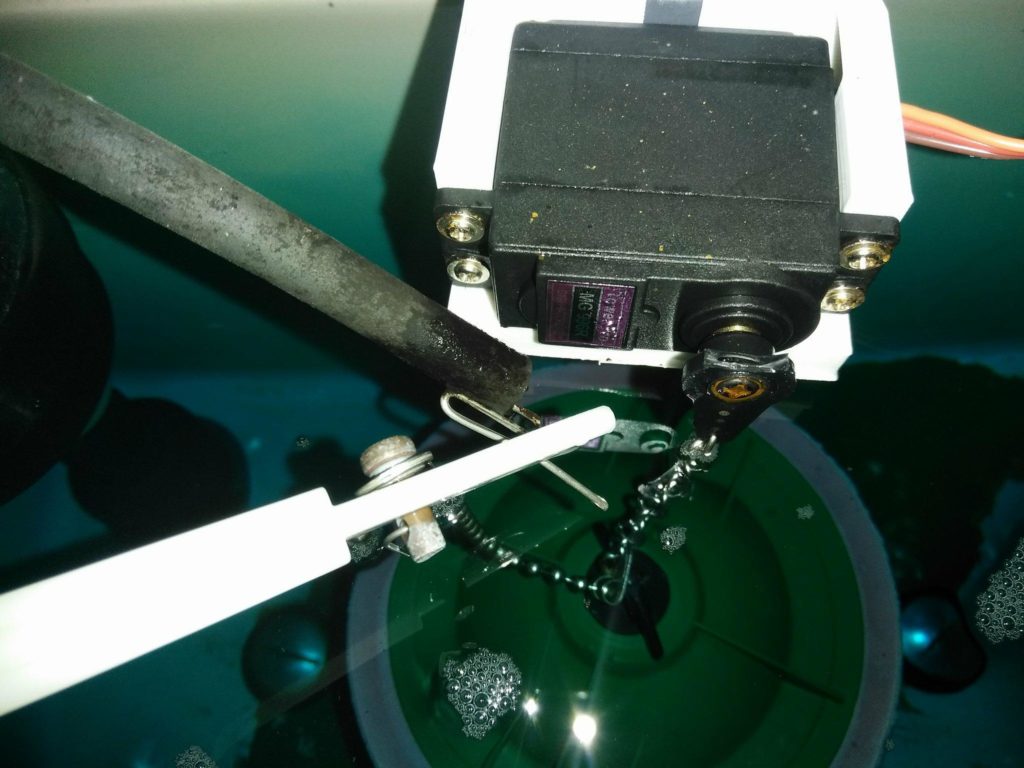
I installed the servo motor to the mount that goes on the overflow valve with two screws on each side.  The chain is mounted from the last hole on the servo arm to the flapper. There should be a little play in the flapper chain. Wash your hands!!!! It is a toilet. 

The original handle can be left installed.  You could also replace the normal flush handle with an electric push button.

Toilet Alexa Echo Dot Servo Arduino NodeMCU Smartthings Home Automation 3d printing case
Toilet Overflow Servo Mounted


NodeMCU Mount Toilet Alexa Echo Dot Servo Arduino NodeMCU Smartthings Home Automation 3d printing case
NodeMCU Mount Toilet Side Mount


Program NodeMCU

Below is the code that I am currently using for this project. The code is horrible and I am working on better code to replace it.  You can download this garbage and use it if you want.  It works but it is not up to my standard.  Feel free to email me or contribute in this section.

Download – Toilet Servo Trash


The Advantage Of 3D Printing

3D printing is an innovative rapid prototyping technology that utilizes a 3D printer to manufacture an actual three-dimensional object. It is currently used in various industries because it is known to increase a company’s profit. However, little is yet known of its advantage in schools.
Both teachers and students need every advantage they can get in order to have a productive educational experience. In school, there must be an effective and efficient imparting of knowledge and skill from the teacher to the student.
3D printing provides new advantages that may revolutionize education. It has unique advantages that may increase the probability of a productive educational experience. Here are three advantages of 3D printing in a school setting.

Enhanced teaching aide

Visual aides are important in effective and efficient teaching. Traditionally, teachers make use of words and pictures either to illustrate a point or to provide an example. With a 3D printer, the teacher has a technologically advanced pedagogical tool at his disposal that is much better than the conventional visual aide. Instead of using mere words or pictures when giving a lecture, the teacher can now present to the class a three-dimensional object, which the students can see and touch.
As an enhanced teaching aide, 3D printing is extremely beneficial in classes wherein three dimensional models are a must see. In a World Civilization class for example, there is no better way to discuss the Taj Mahal of India than to show a miniature three-dimensional model of this oriental architecture marvel. By showing a small replica of the Taj Mahal, it is easier for the teacher to seize the interest of his students compared to just showing them a pictorial representation. It is also easier for the teacher to discuss the Taj Mahal because it is as if the structure itself is present to them. What are normally considered as boring history classes like World Civilization can now become interesting with the use of 3D printing.
3D printing as an enhanced teaching aide makes a class interesting for students. More often than not, it is when students are interested that they get to learn more in school.

Innovative student projects

Imagine a school with engineering and architecture students who have access to a 3D printer. Since 3D printing is a rapid prototyping technology, in which a physical object is constructed by a machine, the students will be able to produce realistic three-dimensional mini-models of their structural designs without having to waste time and effort trying to build those small-scale structures manually. They will also be able to identify the mistakes of their design, get to receive critiques from the teacher, and edit their projects all at a faster pace.
Aside from engineering and architecture, 3D printing is of advantage to Multi-Media Arts students. With the help of a 3D printer, their three-dimensional computer aided designs can now come to life in the real world. Now that is something new.

Interactive class activities

Another advantage of 3D printing is that there is more room for interactive class activities. The interaction is of course limited only to the imagination of the teacher and his students. In a biology class for example, the teacher through the use of a 3D printer can create a 3D model of a person’s head. As part of the activity, the class will have to supply the rest of the body parts by creating them through the use of the 3D printer.
3D printing is a ground-breaking technological advancement of our age. Since it offers novel advantages that assist in the fulfillment of a productive educational experience, it is only reasonable that schools begin utilizing 3D printers.

3D Printing Files

3D Printing Files

The two most common printer files you will encounter are .STL and .Gcode files.  Understanding these will remove some of the confusion when 3D printing for the first time.

STL Files

The first file we will cover are .STL files.  This file format is supported by many different modeling programs that are used for creating 3D shapes of objects.  The files are created using CAD (Computer aided design) like AutoDesk, Fusion360, TinkerCad and many more.  The data  stored in these files do not take into account what type of filament color or types you are using.  It is not possible to print .STL files directly because your printer does not know what you want to do with the model.  You will need to “Slice” this model into .Gcode so your printer can understand it.

Gcode Files

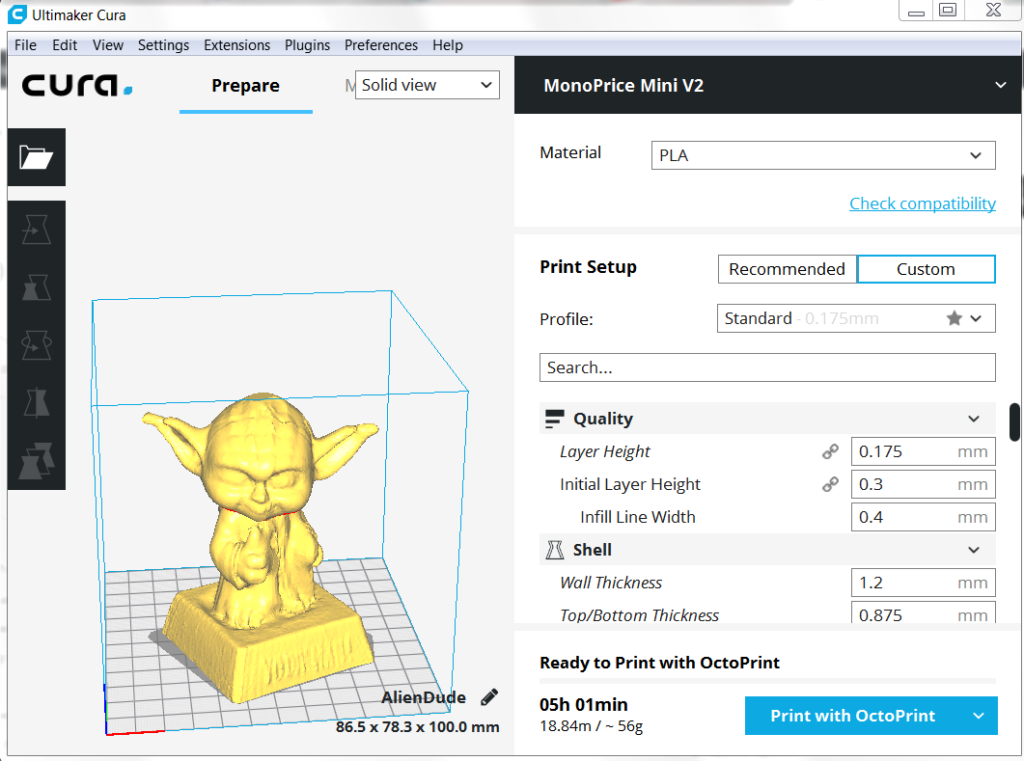
You’re probably asking yourself, “How do I slice and why do I need to do this”?  Creating or finding the part is only half of the equation when 3D printing.  You need “Slicing” software, like Cura, to create the instructions your printer needs to build the model on the 3D printing build plate.  The code is a jumble of letters and numbers that the printer uses to understand how fast to move, when to retract, how much plastic to feed and at the exact X/Y/Z coordinates.  Gcode is also used when operating CNC Machines (Computer numerical control) becuase it defines how fast and at the exact X/Y/Z coordinates the tool should cut.

Basically, to create the Gcode you will need to load your .STL files into a slicing software to tell the printer how to print.

Octopi – Send Prints From Cura

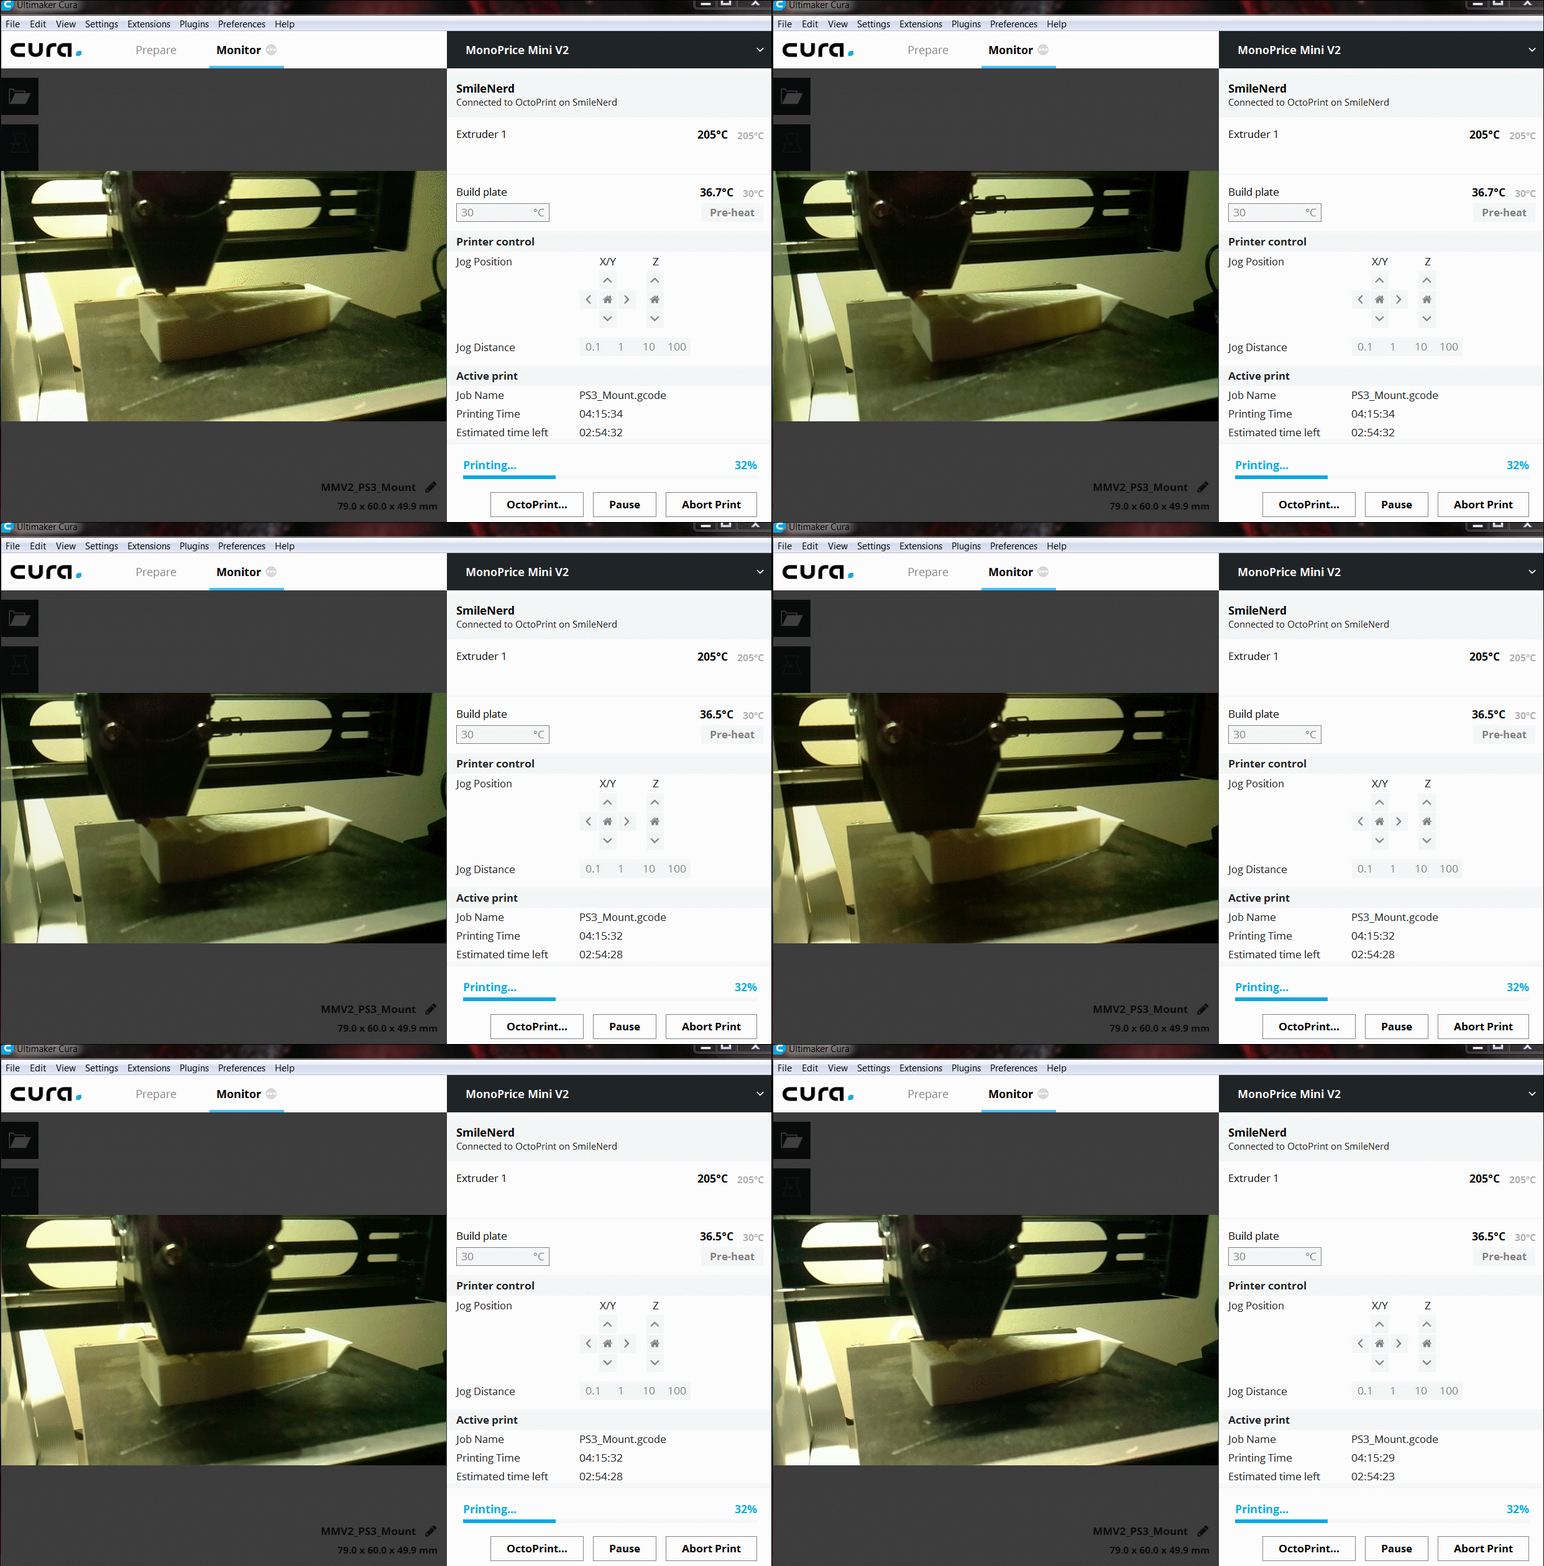
Cura allows users to send and monitor prints directly from the slicer.  Adding this new option send the prints to Octopi, starts the print and will show a preview window with of a webcam.  There is another option to store the G-code directly to the SD card on the printer but it is not recommended.

Instructions:

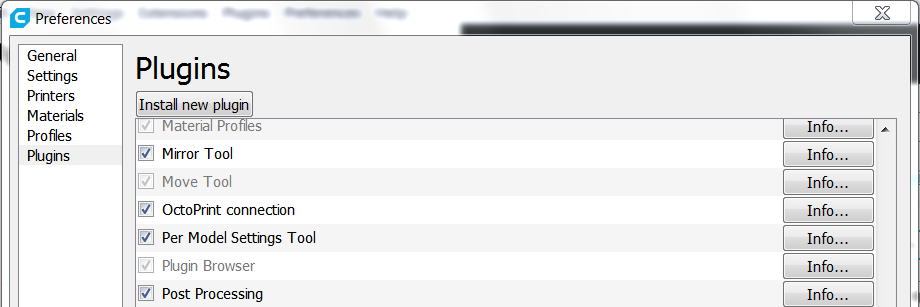
Verify Octoprint plugin is installed

With Cura open, click on Plugins and Browse Plugins..

In the preferences window, verify that OctoPrint Connection is checked.

If the option for Octoprint Connection is unavailable , select Plugins and Browse Plugins.. from the main menu.  Download the OctoPrint Connection plugin.

Configuring Cura for Octoprint

With Cura open, click on Preferences and Configure Cura..


Click on Printers in the left menu.  Click on Connect OctoPrint.

The default setting connects to octopi.local/I have found this to be unreliable so I created a new setting that points to the static local IP of my Raspberry PI (Octopi).   To do this click the Add button.


Type an instance name.  You can use any name you want.  This would be useful if you have more than one Raspberry Pi setup.

Type in the IP address for you Raspberry Pi running Octopi.  The default port number is 80.  Click on the Ok button.


You will need the API Key from Octopi to complete the connection to Cura.  Navigate to the home page on your Octopi Setup.  (octopi.local/).

Click on the wrench on the menu bar of the webpage to open OctoPrint settings.

In the left menu, click on API.

The API Key will be in the field to the right.  Copy the text for the API key.


Navigate back to Cura.  You will need to enter the API Key in the field below.  You have the option to check Automatically start print job after uploading, Show webcam image and Store G-code on the printer SD card. 

I checked all except the option to save the G-Code to the printer SD card.

Click Close.

There will now be an option to Print with Octoprint in Cura.

The monitor tab can be used to control the printer, view printer stats and webcam.

Octopi – Timelapse – Camera Setting

I recently covered how to remove the octopus from your time lapse in my article here.  Another setting that I had to change was the camera resolution.  I’m only using a $5 Raspberry Pi camera from Ebay but it is much better than the defaults used by Octopi.

You will need to SSH into your Raspberry Pi.

You will need to install Putty or WinSCP to SSH into your Raspberry Pi.  I will not cover that in this tutorial.  If you are not sure how to SSH into your Raspberry Pi, go learn how to do that and come back here.  There are thousands of tutorials on the internet but basically you will enter the IP address and SSH port number (typically 22) and your username and password to get to the terminal.

Once at the terminal, you will need to type the following command to get to the correct directory.

cd /boot/

Next, type the command to open the octopi.txt file to change the resolution and fps settings.

sudo nano octopi.txt

Edit the octopi.txt file by pressing down on the keyboard until you get to the #camera_raspi_options=”-fps 10″ setting.  Create a line under this comment using the code below.

camera_raspi_options="-fps 10 -x 1280 -y 720"

Press Control+X to exit.  Save the file and reboot your Raspberry Pi.

You are done.  Enjoy the updated resolution settings.


Octopi – Timelapse – Watermark Removal

The timelapse feature in Octopi is awesome.  It is even better with the pesky little octopus in the bottom left corner.  I will walk you the steps to remove the watermark from your videos.

You will need to SSH into your Raspberry Pi.

You will need to install Putty or WinSCP to SSH into your Raspberry Pi.  I will not cover that in this tutorial.  If you are not sure how to SSH into your Raspberry Pi, go learn how to do that and come back here.  There are thousands of tutorials on the internet but basically you will enter the IP address and SSH port number (typically 22) and your username and password to get to the terminal.

Once at the terminal, you will need to type the following command to get to the correct directory.

cd ~/.octoprint/

Next, type the command to open the config.yaml file to change the watermark setting.

sudo nano config.yaml

Edit the config.yaml file by pressing down on the keyboard until you get to the webcam settings.  You will need to either create the watermark line in this file or change the setting from true to “false” by typing over the current configuration.

webcam:
ffmpeg:  /usr/bin/avconf
watermark:  false

Below is an example of my configuration with the watermark removed.

Press Control+X to exit.  Save the file and reboot your Raspberry Pi.

You are done.  Enjoy a watermark free image.


OctoPi Control – MonoPrice Mini Select V2

Octopi is a Linux distribution that gives you the ability to control and view most 3D printers from a webpage.  There are options to create a video time lapse, temp control, temp monitoring, bed temp control, print storage, view Gcode as the print is happening and a terminal to view and send commands.  The printer also has Cura 15.01 baked in so you can slice your files on the Raspbery Pi.  Although that option is available, It is slow and an outdated version of Cura so I typically upload the Gcode files that I’ve already sliced from my computer.There are install instructions for Mac and Windows, however this distribution was designed to operate on a Raspberry Pi.

Installation

For a typical install you will need hardware below:

  • Raspberry Pi (I use model 3)  $35
  • A camera (I use a Pi camera from eBay $5)
  • 32GB micro SD card $10

Download the latest OctoPi image from https://octopi.octoprint.org/

Insert your micro SD card into your computer and note the Drive letter.  ***If you choose the wrong drive letter when using Win32DiskImager you overwrite and unintended disk.  You’ve been warned. ***

Use Win32DiskImager to load the image onto your SD card.  Select your image in the Image File drop down menu.  Select your SD card drive letter from the Device drop down menu.  Click Write to begin writing.
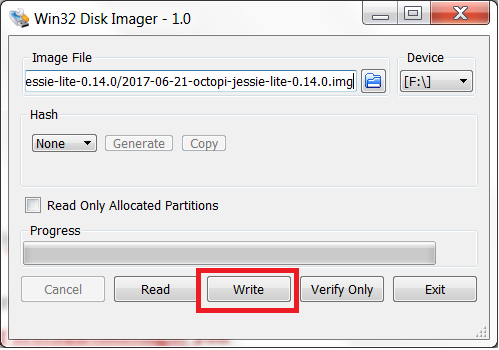
Once the write process has been completed, you will want to edit the network configuration file on the SD card so that your Raspberry Pi will know which network to connect to.

Open octopi-network.txt with Notepad++.

You will type your router’s SSID and password in the text file and remove the # symbol to allow the commands to execute.

Example of lines edited:

Before

##WPA/WPA2 secure
#iface wlan0 inet manual
#wpa-ssid "put SSID here"
#wpa-psk "put password here"

After

##WPA/WPA2 secure
iface wlan0 inet manual
wpa-ssid "MyHomeWifiName"
wpa-psk "MyHomeWifiPassword"

Save the text file.

Eject the SD card and insert it into the Raspberry Pi.

Power the RaspberryPi on.

Next you will access the Octopi webpage that is being hosted from the Raspberry Pi by typing in the ip address of the Raspberry Pi in your browser.  If you do not know the ip address of your Raspberry Pi, you can check your homes router to view any newly connected devices or use a network scanning tool.  You can also use the link http://octopi.local/ to access the page as well.


When you first access the Octopi, you will be prompted with questions about security.  It is your option to use a user/password to access your printer.  I recommend securing this if you plan on accessing your printer outside of your network through the use of port forwarding.

Printer Profile Setup – Monoprice Mini Select V2

Note: These instructions only work for the MonoPrice Mini select V2 (MPMS V2).

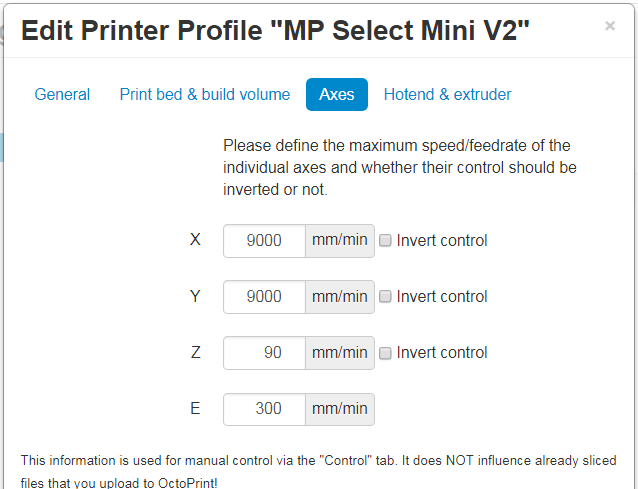
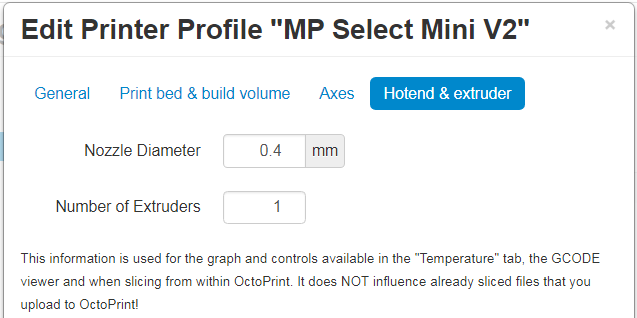
Use the printer settings below for reach of the option menus and then click “confirm” at the bottom.
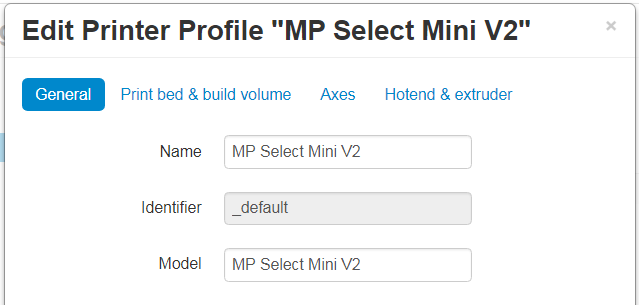
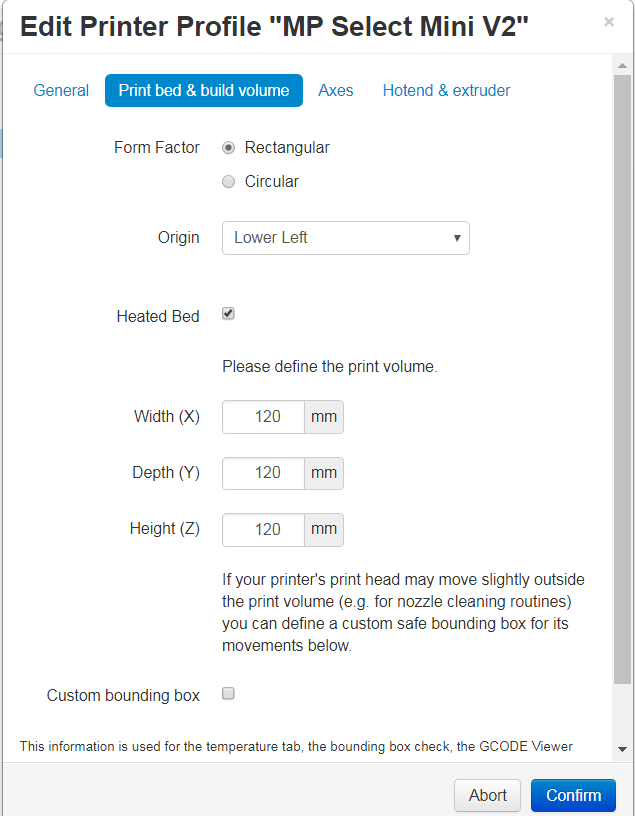
Once your printer has been setup and your Raspberry Pi has been restarted, go to the main page and select your printer from the connections tab.  Select 115200 for the Baudrate.  Click the connect button to connect your printer.
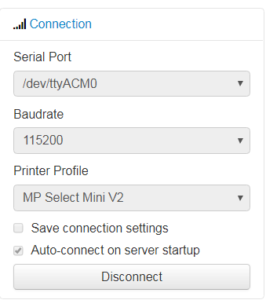
You can view that your printer has successfully connected by looking at the state of you printer on the left side of the main webpage window.

Troubleshooting

-Everything is working but the printer will not connect from the octopi webpage

Verify your printer settings are correct.  There is a wrench (settings) button in the top right corner.  The printer profiles can be edited here.

I sometimes have problems connected to the printer that was previously working and the connection will timeout.  Click connect then immediately disconnect and connect again.  I do not know why this works but it resolved my issue.


2 Axis Servo Project

This is a little project that I worked on that involves using servos in a 2 axis setup.  This is a really cheap project that outlines some of the great things that you can do with a few servo motors.  This setup can be used to swivel a small camera on 2 axis.  We used it to create a Lego tilt-a-whirl.

Materials

  • Computer (to upload Arduino code)
  • Arduino or Arduino compatible device (between $2 and $20 depending on the device you purchase)
  • 2x SG90 Servo motors.  ($1 each on eBay)
  • 2-Axis SG90 Gimbal Bracket for SG90 servos (pic below) ($1.80 on eBay)
  • Male to Male jumper wires ($1.50 on eBay for 40 pack)

Wiring

The red wires for both servos will connect to the 3.3v pin on the Arduino.  The brown/black wires for both servos will connect to ground on the Arduino.  The orange wire for the bottom servo will connect to pin 9.  The orange wire for servo the top servo will connect to pin 10.  The Arduino will get power from the USB port from either your computer or from an optional USB battery bank.

Code

I will build a few variants that you can use to upload and test.  You can use these an example to get you started working with this setup for your own projects.  These servos typically rotate 180 degrees and you will see these positions used in the code to point the servo where we need them.


Project 1 – Swivel/Tilt

I attached a little Lego man at the top so that you can see the tilt from the second servo motor.   The top motor tilts at 45 degrees and the bottom motor does a 180 degree swivel before both return home.  Video and code below.

#include <Servo.h>

Servo myservo1; // create servo object to control a servo
Servo myservo2; // create servo object to control a servo

void setup() {
 myservo1.attach(9); // attaches the servo on pin 9 to the servo object
 myservo2.attach(10); // attaches the servo on pin 9 to the servo object
}
void loop() {
 myservo1.write(0); //moves bottom servo to position 0
 myservo2.write(0); //moves top servo to position 0
 delay(800); //Delays were added to give the motors time to complete the action 
 
 myservo1.write(180); //turns bottom servo 180 degrees
 myservo2.write(45); //turns top servo 45 degrees to tilt down
 delay(800);
 
 myservo1.write(0); //moves bottom servo back to position 0
 myservo2.write(0); //moves top servo back to postion 0
 delay(800); 
 }


Project 2 – Randomized Motor Position

I use similar code as above but I changed it so that servo positions were picked at random.  I set the bottom servo to 180 degrees and I limited the top servo to 90 because the Lego man would not survive otherwise.

#include <Servo.h>

Servo myservo1; // create servo object to control a servo
Servo myservo2; // create servo object to control a servo

void setup() {
 myservo1.attach(9); // attaches the servo on pin 9 to the servo object
 myservo2.attach(10); // attaches the servo on pin 9 to the servo object
}
void loop() {
 myservo1.write(random(0,180)); //Randomly moves the bottom servo up to 180 degrees
 myservo2.write(random(0,90)); //Randomly moves the top servo up to 90 degrees. 
 delay(800); 
 }

Project 3 – Crazy Randomizer

This code is similar to project #2.  I turned the delay down and limited the positions.  Chaos ensues for Lego Man.

#include <Servo.h>

Servo myservo1; // create servo object to control a servo
Servo myservo2; // create servo object to control a servo

void setup() {
 myservo1.attach(9); // attaches the servo on pin 9 to the servo object
 myservo2.attach(10); // attaches the servo on pin 9 to the servo object
}
void loop() {
 myservo1.write(random(45,180));
 myservo2.write(random(0,80)); 
 delay(75); 
 }


Project 4 – Pencil Precision

I removed Lego man and added a pencil so you can see the full range and motion with attached devices. You can use loops and other forms of control to create slashing movements or slowly pan one position at a time.

#include <Servo.h>

Servo myservo1; // create servo object to control a servo
Servo myservo2; // create servo object to control a servo

void setup() {
 myservo1.attach(9); // attaches the servo on pin 9 to the servo object
 myservo2.attach(10); // attaches the servo on pin 9 to the servo object
}
void loop() {
 myservo1.write(0);
 myservo2.write(0); 
 delay(750); 
 myservo1.write(180);
 myservo2.write(180); 
 delay(750); 
 myservo1.write(0);
 myservo2.write(0); 
 delay(750); 
 myservo2.write(180);
 delay(800); 
 myservo2.write(0);
 delay(800); 
 myservo1.write(90);
 myservo2.write(90); 
 delay(800); 
 myservo1.write(180);
 delay(800); 
 myservo2.write(45);
 delay(800); 
 myservo2.write(135);
 delay(800); 
 myservo2.write(0);
 delay(800); 
 }

Arduino – What is it?

Arduino is a company that produces open source hardware and software used to control micro controllers.  Most of the Arduino, or Arduino-like, hardware you find will use one of the various Amtel Atmega and Attiny microchips.  These chips vary in size, shape, number of pins, flash memory, cost, PWM  (pulse width modulation) channels, timers and more.  The software is a mixture of C and C++ programming languages.

Arduino boards are typically used for simple, repetitive tasks.  Keep in mind these are not full blown computers.  Typically, you would select the hardware you would like to use (lights, servos, led displays, temperature sensor, valves, etc) and program how you want the micro controller to handle the input and output.

Arduino has reduced the learning curve and added error correction with programming microchips for prototyping your projects.


Raspberry Pi vs Arduino

I’ve heard the argument that a Raspberry Pi is better than Arduino because it is basically a small ARM based Linux computer with input and output pins.  I disagree with this completely.  The Pi has it’s purpose but it can be outdone by the Arduino in many cases because you can purchase and use ONLY the components you need.  A great example is that you would like to build a solar platform to follow the sun.  All that would be needed is a cheap Arduino board, some servos and a photo-resistor.  It will use less power, provide better reliability and be more cost effective.

The Raspberry Pi is a small computer that comes with video, audio and USB input/output.  Arduino is only use one main component, the micro-controller.   The Raspberry Pi uses 200-700 mA under different uses while the Arduino only uses a few millamperes.  I’ve found projects on the internet that use only the Atmega chipped programmed using Arduino software that can run for years on a single battery.

Device Types

There are many different types of devices that can be programmed by Arduino.  The list of devices that can be programmed with Arduino is longer than the Wiki found here.

Arduino Uno

The most popular board is the official Arduino Uno and it is currenlty listed for $22 at the Arduino store.  I recommend starting with this board as it is the most capable to test and learn with.   As you learn, I recommend keeping this board available so you can test and purchase a specific board that will meet your project’s needs.  There are a ton of pins that can be used for both input and output.  The ~ beside the pin number indicates that it is PWM capable (typically used for servos).

https://store.arduino.cc/usa/arduino-uno-rev3

NodeMCU

The next board is a Chinese variant know as the NodeMCU.  This board can be purchased for as little as $3 and is half the size of an Uno and is Wi-Fi capable out of the box. I was able to host a webpage from this device and connect an LED that could be controlled remotely.  You could connect a relay and use it to power devices on and off.

Digispark

The Digispark is uses the ATtiny microchip and is roughly the size of a quarter.  The Digispark pro actually has built in Wi-Fi.  Chinese variants can be found for as little as $2 online.  You will have limited inputs/outputs and the programs that you upload will be limited in size but the advantage is clear.  These are a no-brainier for small compact projects that only require a few pins.

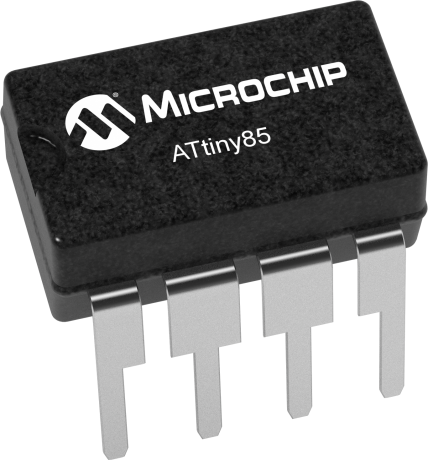
ATtiny85

It is possible to build your own board and program the ATtiny85 in a stand alone project using an Arduino Uno.  I actually programmed one of these chips to control a MAX7219 Led display kit that I bought on eBay for $1.50 shipped.  See the video below if you’re interested.